Thursday, December 27, 2012

Gift card and candy bouquet


This is one of the presents I gave hubby for Christmas and thought I would share with you how I did it, I am sure it is pretty self explanatory.

You will need  a box or a cute cup, Styrofoam, shredded paper (all of which I got from the dollar store)
Popsicle sticks or flat sticks (I got mine at walmart)
Gift cards
candy
Packing tape

Start by placing your Styrofoam in your box or cup. Tape your gift cards and candy onto your sticks( I used a glue gun on mine and had some trouble getting them off the sticks, learn from my mistake).

Next start sticking your sticks into the Styrofoam and arranging things how you want.  Once you get it how you want stuff your shredded paper around and between the sticks, until they are all covered.

I also made some for 2 of my nephews with a McDonald's gift card and candy using a mickey mouse cup and a snoopy cup (found in the party section at walmart).

This is a great gift that is easy to make, works for anyone and is easy to have on hand. I think this is our new birthday gift for parties this year.

Saturday, December 22, 2012

Let it snow banner


 Here is my banner that I shared at embroidery club.
 Here are a few close ups.

Thursday, December 20, 2012


 I finally finished making these cute reindeer ornaments for Little man's class.(21 of them) The only problem is, is that he has been home sick with croup since yesterday and will not be going to school until after the new year. I had all but 3 finished so I decided to just finish them and let K take them and drop them off to his teacher to hand out.

 Mr K has also been home sick with croup since Sunday. At least it is before Christmas and not on Christmas.


 I have also had a few people in need of embroidery, this is the latest one.
 I did  owls for her 2 nieces
 and this cute bear for her nephew

Saturday, December 8, 2012

Party Day


Well today was Little man's party, and he was pretty excited
 Here's the table all set ready for pizza and cake
 I decided this time I was keeping it simple and made cupcakes and toppers (in photoshop) instead of a cake.
 Well I thought I was, but B asked where his smash cake was(she is very much liking the idea of smash cakes for not just one year olds lately) and I said well I didn't make one, but since I had left over batter from the cupcakes I poured it in a pan and made one.
 The problem with making a cake and frosting it too hours before the party, is that it is very crumbly and does not frost well. B said "it's fine mom, it looks like they had a battle"

Apparently I did not take pictures of all the activities so here is a run down of what we did: as the kids came they were issued their gear, a helmet and  a shirt my sister in law screen printed with the word army across the front. Next it was time for sergeant says, B was my sergeant (she even wore an army shirt because we had an extra one, kind of sad that she fits into a 6 year olds shirt)

Next we had physical training which consisted of sit ups, push ups, running in place etc, then it was on to the mess hall then off to basic training camp, where they had to do an army crawl under a net, weave in and out of cones, and up and down the stairs.

We then did target practice using a printable I found HERE and nerf guns.

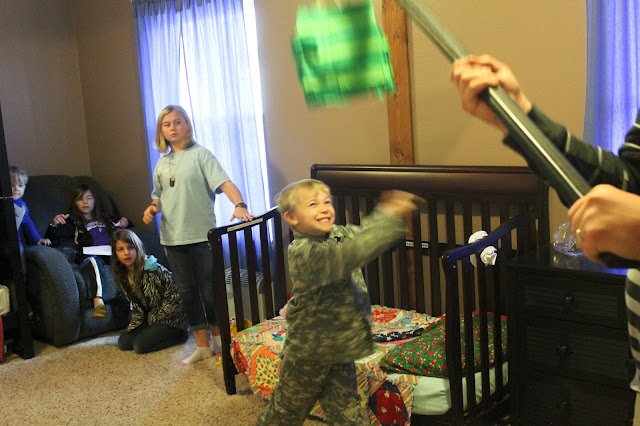
We did the pinata next.  Little man hitting the pinata as hard as he can
 the candy scramble. The pinata lasted through them all hitting it twice.
Cake time was next. blowing out the candles

 He LOVED the idea of a smash cake and didn't hesitate to dive right in


 Here is the inside of the cupcakes...camoflage

Then it was present time and time for kids to go home.

I really need to do a better job at taking pictures, I apparently didn't get a picture of all of the kids together either.

Friday, December 7, 2012


This year Little man wanted to have an army guy party, he has been slightly obsessed with anything army/camouflage for a while now. I tried to talk him out of it because I already had one for K a few years ago, and do not like to repeat parties, but he was insistent on it and nothing I came up with was good enough, so army party I planned.

Here is his invitation I made using photoshop. Add your last name and base after the Report to. I have to say  even though this doesn't look all that impressive I am pretty impressed with the way it turned out because I learned how to use photoshop brushes and a few other techniques. I don't know how I didn't know how to do this before.

 I made little pockets out of paper and put air heads in them for "air raids" I know the kids will not understand it but I thought it was fun. I made the tags in photoshop.
 Here is a better look

 Here are my "rescue ropes" made out of licorice, I was going to put them in plastic bags and make the topper and then found them individually wrapped and decided to just glue them into the topper instead. The topper was again made in photoshop.


 So I found this awesome idea and tutorial HERE and thought how could I NOT make a paper bag pinata? So I ran to the dollar store in search of crepe paper but was only able to find the light green, so I went to hobby lobby and was able to find the dark green, and also the brown paper bag (you can use any bag)
 I got to work gluing and folding...two layers of dark green and then one layer of light green. On the back I did not "ruffle" it and just glued it down flat. Then I made my sign in photoshop, printed it out and added a ruffle to the back and glued the whole think on. Filled it with candy and stapled the top closed.
 I bought juice boxes and covered them with brown paper(remove the straw before doing this) then let Bricanie decorate them to look like walkie talkies, then taped the straw back on the back to look like an antenna.

Thursday, October 25, 2012

Visiting Teaching Gifts


For the ladies that I visit teach and my partner, I made these fun ghost tealight covers for halloween. This is an embroidery design from embroidery garden.
I  put them in a cute halloween cellophane bag and attached a poem I found HERE
Here is a close up of the poem. They put ghost peeps with theirs, but I thought it would be more fun to do the tea light covers.

Tuesday, August 28, 2012

First Day of school gift


Today was the first day of not only school, but the first day of  me having a middle schooler as well.
 I made these for all the kids in middle school car pool. I found the idea Here.

Friday, May 18, 2012

Projects for Embroidery Club

I am part of a machine embroidery club that meets once a month. We have a short time at the end of club to have a show n tell of things that you have worked on throughout the month, so here is one of the things I have been working on.
I found the note book at the dollar store and was able to carefully peel back the front cover and  embroider a letter on the front cover and then glue it back together. I think this will be used as a teacher gift for the end of the school year. I bought 6 of them so now that I know it will work you may be seeing more of them in the near future. I am now wishing I would have bought more.

I am also taking Princess B's "game day" outfit and the yellow dress with the flowers on it to show as part of my show n tell.


Thursday, May 17, 2012

A wedding shower gift.

My cousin is getting married next month and I was invited to go to her wedding shower. I will admit I have not been to a wedding shower in F.O.R.E.V.E.R. and was not sure what to buy. Then I remembered an idea that I pinned (I love pinterest)
it was a cute basket for a date night from Darling doodles blog and to make it even more perfect...she had a printable with a cute poem ready for you to download.
 I loved the cute little poem she had but thought the font was too hard to read so I made my own with some clip art that I had from doing a movie night birthday party for B. 

I went to walmart to get all of my stuff  I got a plastic bowl instead of a basket to putt it all in. Here is what I put in mine:

A movie- mine happened to be Princess Bride(which I know she loves and doesn't own)
A couple bottles of Root beer (the ones in the glass bottles, because I thought it would look cuter)
Some bags of microwave popcorn
Red vine licorice
and some boxes of theater candy-sweedish fish, junior mints,recess pieces,mike and ikes, skittles, and one other that I can't remember.

When I had all my stuff I ran over to the dollar store to get a roll of cellophane and a cute bow and went home and assembled the whole thing.

I crumpled up tissue paper and put it in the bottom of the bowl and arranged everything on top of that.Then I wrapped the whole bowl in cellophane and a red curling ribbon bow and tied the tag on.

The whole gift including wrapping cost me 27.00 not bad right?

Check back next month for the wedding gift.


Wednesday, May 2, 2012

Productive


It has been crazy and busy around our house lately and it seems like all I ever do anymore, besides holding Princess B ALL the time, is clean and run kids from place to place.Well today I decided that I would do minimal cleaning and then I was going to get some projects done that I have been trying to do for awhile 2 of them are baby gifts and their babies are already 4 months and 2 months(oops).

Here is the blanket I made for my neighbors baby (who is 4 months now). This is a new design that I just bought and thought it was so cute that I had to try it out.

Here is the second blanket I made for another lady in our ward who's baby was born 4 days after Braelynn. I love this bear he is so cute.

I may be late getting them to them, but at least the blankets are big enough that they will be able to use them this winter.

I found this dress for Princess B at walmart (for 5.00),it was plain with no flowers when I bought it (I forgot to take a picture of it before) and I looked at it at least 3 different times before I actually bought it.
I knew that I wanted to embroider something on it but I was not sure what. I was deciding between adding black and white, or a hot pink. Some of the ideas I had was the most obvious a bee, or a ladybug or butterfly, but then I decided that I wanted black and white and I did not want a bee because it was so obvious.  So I found the cute flower design and knew that that was what I wanted to put on it.

I love how it turned out. I can't wait until it actually fits her. I will be making her a hair accessory to match of course.
Here is a close up of the design. Now I am on the look out for clothes that are plain that I can add my own design to.
We have season tickets to the Blaze games, so of course she needs a game day outfit right? I was going to make her a skirt and then remembered that Halo Heaven had a black and orange petiskirt so I decided to just buy it instead of making it because for the price it was worth it. If you have never been on their website here is a link Halo Heaven. If you have girls and they love hair bows, and flowers and skirts, run don't walk and go check it out I love this site.

Anyway back to the outfit. I embroidered a football helmet onto a onesie to go with it and will be making a matching hair bow(I will post it when it is done.)
Here is a close up of the shirt. I just wish that I could find cuter plain white onesies...you know the ones with the cute puff sleeves. 

So even though I didn't get much cleaning done, I did get a lot done today and Princess B ended up having to cry for short periods of time, but she survived. 

Saturday, April 21, 2012

Monthly onesies-Month 2


You may remember that I was making the monthly onesies...well it is time for Month 2 (excuse me while I wipe away a tear).


Cute crooked half smile.

Telling me stories.

She was getting so excited
big smiles...

I may have to rethink how I am attaching them because she kept getting a hold of this one and making it move.


Sunday, April 1, 2012

A Conference tradition

Twice a year my Church airs General conference. For the Sunday session each time my mom comes over and we make Ableskievers and sew while listening to our Prophets speak.

For those of you that do not know what Ableskievers are  they are a kind of Scandinavian pancake, I know there are many different versions of the recipe and I am not claiming I have the original recipe this is just the recipe that my grandma was given from a Scandinavian friend.

So here is the recipe and a quick how-to

2 cups buttermilk(I used powdered buttermilk cause I don't want to go out and buy regular buttermilk to use once)
2 cups flour
3 eggs sepearated- put egg whites in separate bowl to beat later. put the egg yolks in the bowl with the other ingredients.
2 tablespoons sugar
1 teaspoon baking powder

In large bowl  mix dry ingredients together add buttermilk and egg yolks and beat together. (if using dry buttermilk follow directions on package).
Beat egg whites till stiff not dry, FOLD into other mixture. DO NOT STIR.

*side note from me- the buttermilk will make the ableskievers fluffier and gives it a yummy taste.
here are the egg whites before they are beaten.
Here are the egg whites after they have been beat. I am going to fold them into the mixture.

Ok now here is how you make them. First off you need a special ableskiever pan. I of course did not take a picture of just the pan, but it looks like this.

Also this shows you what they look like before you turn them and after you turn them.as they cook you turn them a quarter turn until you have turned them completely and they are done. Make sure you put in a bit of oil in each cup on every batch you do or they will stick. I spoon in my oil and then stir it around to coat the sides (I hope that makes sense)
  This is after they have been turned all the way and are ready to eat. We ALWAYS have two pans going because my kids LOVE them and eat them faster than I can cook them.
Here they are in the bowl ready to serve. Like I said I can not get them out fast enough.

So you are supposed to put applesauce or jam in them while you are cooking them, I have had them this way several times and they are good, however our favorite way to eat them is dipped in a little bit of sugar.We just put some sugar in the bottom of a bowl and dip them that way.


After making ourselves sick eating these yummy things we set up all the machines. The girls each have their own machines and I have 2 plus a serger. 


This year was a little more hectic with a new baby and all but we just got creative and figured out a way to make everyone happy. 
My mom got the princess to sleep (finally) and laid her on the table in the middle of all the action and she slept great which made it so we could help the girls make their Personal progress holders. 


If you aren't familiar with personal progress you can learn more here


I found the tutorial for the holder Here


This is B's all done and closed
The first side open
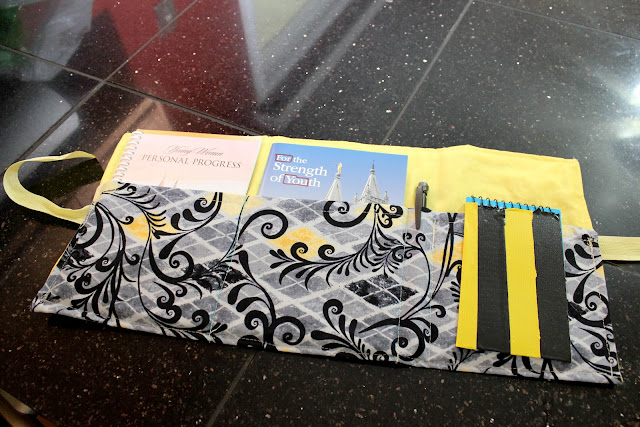
All open.  There is a place for the personal progress book, For the strength of youth pamphlet and a note book and pen. I really need to get her a better notebook, but for now it will work

I guess I never took a picture of K's...oops it was the same just different material. B may be teaching this for a Young women's activity for one of her personal progress goals.