Saturday, August 17, 2013

Candy Themed party

This year Boo was having a hard time deciding what to do for her birthday so I started throwing ideas out and the only one she liked was a candy themed party. I had a lot of fun planning it but a little advice...candy is expensive. And yes you may be thinking to yourself isn't her birthday in July? Yes, yes it is, but since we were gone to Philmont for her birthday and then we had a million other things going on this was the only day that worked to have her party on. 

Here is her invitation that I made using photoshop. It is a good thing I took a picture with my phone to send to a friend of mine otherwise I would not have a picture of her invitations. We passed them out without me getting a picture.

Here is our candy buffet. I have been buying candy and jars for the last few months.

I made the banner and labels for the candy jars using Photoshop.

Licorice, pixie sticks, sweet tarts, giant lollipops

m&m's, laffy taffy, starbursts, skittles

air heads, lemon heads, jolly ranchers, swedish fish.

I used plastic plates and balloons wrapped in cellophane to make a candy garland.

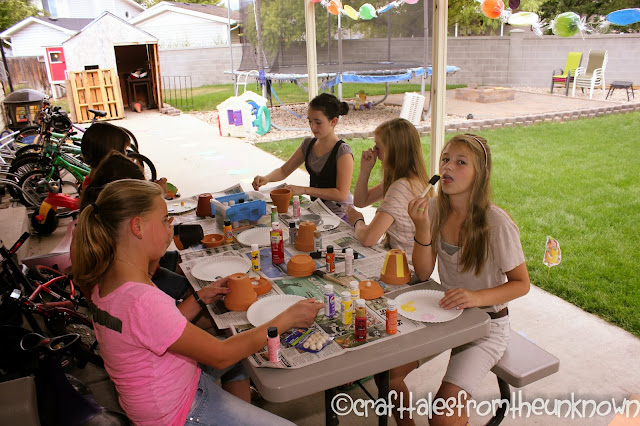
We started out with each of the girls  painting a clay pot for our project so we could make sure they had enough time to dry. I am sure you know exactly what we made, but if not I will show you in just a bit.

 Yep we made candy jars that look like bubble gum machines.

They later filled these with all of the candy you saw on the candy buffet.

We played life sized candy land. I  used construction paper and taped it to the side walk for the squares.I was going to use fun foam but decided that either way they were going to get ruined. I used plastic plates stapled together and placed on sticks for our lollipop trail. I planned on wrapping each one in cellophane and tying them with a bow, but I ran out of time.

Here is one of the dice I made. I had another one just like this only each side was a different color. They rolled the colored dice to see what color to move to and if they landed on a pink they rolled this dice to see which person they went to. I printed out another set of the people and placed them at different pink squares along the "game board".

 After we finished a game of candy land we played two more candy games. The first one(no pictures) I took a bowl and filled it with skittles and the girls sat in a circle and reached in the bowl and pulled out two skittles if the colors matched they could eat them, if not they had to hold them in their mouth until they got two that matched. I think Kierra ended up with 18 skittle in her mouth before she was able to eat them.

After that we played the candy bar game...I am sure I have explained this one before since this is a game that both my girls love to play and we have played it at several parties. To play you need a candy bar or two for each person, no duplicates if you can( I did enough for 2 each plus a few so they had a lot of choices, I added gum this time)and two dice. Put the candy bars in the middle of the circle and each player  rolls both dice, if they get a one or a six(not adding the dice together) or doubles they get to pick a candy bar from the middle and then hide it behind their back. When the next player gets a one or six or doubles they can still a candy bar from another player only if they can name the candy bar that player has, or they can take one from the middle. Play continues this way until the kids get tired of it or everyone has what they want.

Every time we play this game there is always one or two candy bars that are in pieces from being traded so many times. This time it was a Hersheys cookies and cream candy bar  and shockers.

 After the game it was time for cake and presents. This is the cake Kierra chose for me to make, which I totally love her for because it was so EASY and I still have yet to master the whole cake decorating thing.


The girls went home with a cute candy dish and a ton of candy. I hope they all had a fun time. 

Tuesday, August 6, 2013

Personal Progress Motivator

B is in the Young Women's presidency and decided that she wanted to encourage the girls to work on Personal Progress each month so we started doing personal progress motivators.

 I found the original idea HERE, but it has since been turned into a private blog.  I found these cute mechanical pencils and made my own calendar then we glued them to card stock using the value colors.


Tuesday, July 30, 2013

Pillow Treats for Girls Camp

My girls are headed to girls camp tomorrow and we thought it would be fun for them to leave "pillow treats" each night for each of the girls. Here is what we did.

 I found the idea HERE but created my own printable to use for it.


 Here is an idea I came up with.


This idea was found HERE but again I made my own printable. 


The girls were so excited to take them to girls camp and try and be sneaky about putting them on each of the girls pillows each night.


Friday, June 7, 2013

Sunshine Basket

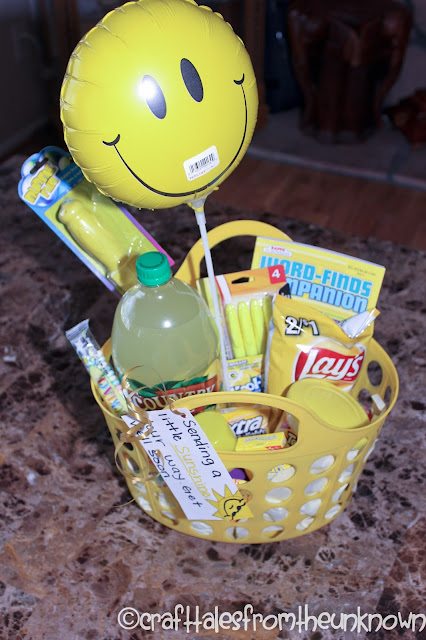
Boo's very best friend learned that she has a growth on her brain and it is leaking blood onto her brain and had to have surgery. She has been worried about her and wanted to get her something so she knew she was thinking about her. So we decided to make her a sunshine basket.
 We went to the store and bought everything we could find that was yellow or in a yellow package. It was harder than you think since her friend can not have dairy(which rules out chocolate) and has braces(which rules out anything chewy).
 We came home and put it all in the Yellow basket we bought(yes I turned around the balloon before we gave it to her...dumb upc).  We added a tag that said, "Sending a little Sunshine your way." Get well soon.  We took it to her once she was home from the hospital and settled in. She is doing great and the surgery went well.


Tuesday, June 4, 2013

Last day of school gifts

Here are the gifts I made for Little mans kindergarten teacher for the last day of school.

I made this photo album using a machine embroidery design for the cover. My original plan was to get all the kids to write the teacher a note and put them in the album and then take a class picture, but I ran out of time.


  I also made this apple banner with his teachers name on it.
Here is a close up. 

 I made these cute otter pop covers for each of the kids in his class...no more paper towels for these kids.  


My printer decided not to work so I ended up having to hand write the tags.


Tuesday, May 21, 2013

Pillow case dress

I decided to make my first pillowcase dress today for Little B. I actually ended up making two of them but wanted to share this one with you. They were really easy to make and I had the first one done in no time, but when I put it on her, she pulled the ribbon ties and untied them and the dress fell off so I went searching for a new way to make it and came across this Tutorial on how to make it with elastic.  It stays on with no problems and was just as easy to make.
 I used the mermaid from Lynnie Pinnie to embroider the dress.

I also used the felt clippie design from Lynnie pinnie to make the bow.


Saturday, April 27, 2013

Shirt for Little B

I have been busy working on lots of projects and thought I would share one that I finished today. It is nothing   extravagant, just a shirt for Little B.
 I bought this shirt and was not sure what I wanted to put on it, I just knew that I wanted something a little different. So while looking through my designs I stumbled upon this darling snail I bought in a set from  Designs by JuJu and knew that I wanted to use it on a shirt.

Grandma made cute green and white ruffle pants that will match this shirt perfectly.

4th of July Towel

I am in the process of making a towel for each of the major holidays, I am making two sets, not sure why, but I thought about giving them to teachers as a Christmas gift. I am sure they will just go in my box of gifts to  use at a later time.

I decided to start with the 4th of July since that is the next holiday that is coming up.
 This is the first one I did, I am not sure what I am putting on the second towel since it is a red, white, and blue plaid. The design is from Embroitique, they have so many cute designs and is a site I am on frequently.
Here is a close up of the design.

I will add the others as I get them done.

Friday, April 12, 2013

Bookmarks

Here are a few more headband book marks I have been working on, I still have a bunch of headbands that I plan on making into headbands, but it will be a little while.


Thursday, April 11, 2013

All about mom coasters

Here is a simple, inexpensive,usable, but cute project you can have your kids make for mom, or grandma for Mother's Day.


Materials needed:


  • 4-8-4.5" x 4.5" tiles(you can use any amount you prefer. these can be found at any hardware store for between .16-.25cents
  • Windex
  • paper towel
  • Modge Podge
  • foam brush
  • felt(which I forgot in the picture)
  • Printable from  HERE or you can make your own. 

Step 1: Start by cleaning/drying each tile with windex

Step 2: Have your child answer the questions on each square and or draw a picture, use the blank one for a picture of the child. (I would have had them color their pictures or use markers to write their answers so there is a little more color to them)

Step 3:Cut out each of the squares


 Step 4: apply a thin coat of modge podge on the back of one of the papers(it is kind of hard to see in the picture) and apply to the center of the tile(picture below), I had the after thought of adding a piece of scrapbook paper to the tile first before adding the question(I would cut mine as a 4x4 square).


 Step 5: Once tile is completely dry apply a thin coat of modge podge on top of the tile over the paper, then let dry.

Step 6: Repeat step 5 

Repeat this process with each tile until you are done
 Step 6: Cut a 4"x4" square out of felt and hot glue onto the bottom of each tile this way there is no worries of the tiles scratching the surface.(Using white felt makes it hard to see, sorry)


 Tie all of the tiles together with a cute ribbon and you have a cute mother's day gift.

Wednesday, April 10, 2013

Baby Gift

Thought I would share a baby gift I just made for a friend of mine who had a baby a few months ago, I intentionally bought it bigger and waited to give it to her so he could fit into it this summer.
I embroidered on the onesie using a design from Planet Applique.
Here is a close up of the onesie.

Tuesday, April 9, 2013

Teacher appreciation gift

The kids had to take a flower today for Teacher appreciation day today, so I made these cute bookmarks for each of them to take.

The design was a free one from Embroidery Garden's Yahoo group. I got the jumbo paper clips from Walmart shortly after back to school time for use in another project but then never used them.


Sunday, April 7, 2013

Conference Sewing

Today was our yearly tradition of having my mom and this year my niece and nephew over for Conference Sunday, where we sew and have ableskeivers.

We taught the kids how to make scrubies,I guess I should have taken a picture so you know what I am talking about. 

After making scrubies I made a cute t-shirt dress for the little one using the tutorial found HERE.

 Here is the front. I made the flower on the front with part of the t-shirt I cut off using THIS
Here is the back of the dress.

I love how it turned out.